
Thursday, September 17, 2009
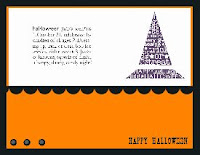
My Digital Studio Greeting Card
This is a card that I designed using the My Digital Studio. It's fun and easy to use. I'm still getting used to using it but I'm having a great time trying to design things!! Hope you enjoy!
Sunday, August 23, 2009
Tasty Sweet Card

I love this Tasty Sweet set! You'll need Whisper White, Basic Black and Pumpkin Pie cardstock. I used my Basic Black, Summer Sun and Pumpkin Pie Stampin Write Markers, 1 3/8 inch circle punch and Crystal Effects

Using the Basic Black marker, color the Trick or Treat part only of the stamp

Then use the Pumpkin Pie marker and color the smaller words. Breathe on the stamp to make the ink become wet again and stamp it onto Whisper White cardstock. Have the card stock the same size as your card

Adhere the stamped image to your Pumpkin Pie cardstock leaving enough room to tear on the bottom

When tearing it, tear the paper toward you

Once you've torn it, adhere it to your Basic Black card

Take your Summer Sun marker and outline the top part of the candy corn. Do not color it in, just give it a small outline so white will show through. Then use your Summer Sun to color the middle section and use your Pumpkin Pie to color the bottom section and stamp it onto Whisper White cardstock. Make 3 of these candy corns


Once you have all 3 of these use your 1 3/8 inch circle punch to punch each one out

Adhere each punched out piece to your card spreading them out evenly onto your card

Use your Basic Black marker and color the Yum Yum Yum stamp and stamp it onto Pumpkin Pie. Cut it using your cutter making it into a small strip.

Adhere it to the bottom of the card trimming off any access

Use your Crystal Effect to give the candy corns the 3-D look. Make sure to cover the entire candy corn and let dry

There you go! I hope you enjoy making this card as much I have!
Thursday, August 20, 2009
Need to brag a bit!
 I have to show off my daughter's 1st day of school pictues! Katy is in 1st grade! We are very proud of her

Hope Bra Card

This is a fun card to make! I made one for my friend who has had breast cancer but is still dealing with more cancer that she has. Items that you'll need is the Wonderful Words 2 stamp set (I used Hope); Whisper White, Basic Black and Melon Mambo cardstock and Melon Mambo ink. Accessories you'll need are your scallop circle punch, the word window punch and a white halfback pearl

Take your Whisper White cardstock and cut it into a 5 1/2 x 4 card. Take your Basic Black and adhere it to the front of your card, trimming off any access.

Take your Melon Mambo cardstock and cut it smaller than the Basic Black so it the black looks like a frame and adhere it to the black

Cut a piece of Whisper White smaller than the Melon Mambo so the Melon Mambo looks like a frame and adhere the white to the mambo

Punch out two pieces of Melon Mambo using your scallop circle punch

Punch out two pieces of the Melon Mambo using your word window punch

Take one of your scallop pieces and cut it leaving 3/4 of it. Cut it straight across from the inside of the points

Position the piece you just cut over the second scallop piece and cut the second one so you have two exact size pieces

Take your word window punched out piece and adhere it to one of the scallop pieces angling it just a bit

So the same with the other set of punched out pieces and now your ready to make your bra!

Before you adhere it to the card, place it on there and see how you like it. Position it next to each other then when you have it like you want, adhere it down to the card

Then take your hope stamp and ink it using the Melon Mambo and stamp it across the top of your card and add a white halfback pearl in the middle of the bra for decoration and your done! I hope you enjoyed this quick and easy card and I hope it brings a smile to someone's face!
Monday, August 17, 2009
Crazy Week
Just wanted to let you know that even though this week and only begun, it's been crazy thus far. First off, my husband is out of town, well more like out of the country for 2 weeks with the Guard. He has our digital camera so I borrowed my mom's so when I make another project, I'll have her camera to take pictures. Also, my husband's mother is in the hospital and had shoulder replacement surgery today. Please keep our family in your prayers during this difficult and crazy time. I'm going on night 2 of our daughter not being home because I have to work and there's not child care for her since school doesn't start until Wednesday. I don't like being in an empty house with Katy being gone and Jason out of the country! So I'll try to get a new project on some time this week but bear with me, I'm so exhausted and trying to keep our family under control, it's just a little hairy around here!! Look for something the end of the week!
Friday, August 14, 2009
Batty For You Halloween Treat Bags
This is a quick and easy project to do for your child's Halloween Party at school or to make to hand out to trick or treaters that come to your door.

I used the stamp set Batty For You. I used Whisper White, Basic Black, Pumpkin Pie, Green Galore and Lovely Lilac cardstock. I used Basic Black, Pumpkin Pie and VersaMark ink. I also used the Big Shot, Top Note dye cut, 1 3/8 inch circle punch and scallop punch. I also embossed one of the images using VersaMark, black embossing powder and heating gun.

Run through your Big Shot a piece of Green Galore and Lovely Lilac using your Top Note dye cut

You'll end up with two pieces. Decide which one you want to layer on top then trim the access off that piece trimming along the perforated edge.

Trim along the perforated edge then use your snail adheasive to adhere it to the bottom layer of the Top Note

After getting pieces put together, fold it in half then use your bone folder to make a tight crease

I used the Frankenstein stamp, inking it using Basic Black then stamping it onto Whisper White

After stamping your image, use your 1 3/8 circle punch to punch out your image

Use your scallop punch to punch out a piece of Basic Black cardstock

Adhere the stamped image piece to your scallop punched out piece

Take the piece and adhere it to your layered Top Note

Next, run a piece of Pumpkin Pie and Basic Black cardstock through your Big Shot using Top Note dye cut

I used the pumpkin stamp, inked it using Pumpkin Pie ink then stamping it onto Whisper White

Use your 1 3/8 inch circle punch to punch out the stamped image

Use your scallop punch to punch out a piece of Basic Black

Adhere the stamped image to your scallop piece then adhere it to your Pumpkin Pie Top Note piece

I used the spider stamp, inking it using the VersaMark then stamping it onto Whisper White

After stamping it onto your paper, cover the image using black embossing power shaking off the access to reveal the image.

Use your heat gun to heat up the image to make it pop out. Your image will become shine. Make sure not to keep the heat directly onto the image because your paper will burn. Make sure to constantly move the heat gun all around the image until you notice it becoming shiny.

Use your 1 3/8 inch circle punch to punch out the stamped image

Use your scallop punch to punch out a piece of Pumpkin Pie cardstock

Adhere the stamped image piece to your scallop Pumpkin Pie piece

Then adhere that piece to your Basic Black Top Note piece

Here is the finished product! I bought small sized jewelry bags from Michaels. After you fill up your bag with your favorite Halloween candy your ready to attach it to the Top Note. Open your Top Note and use your snail adhesive to adhere it to the inside of the Top Note, butting the bag to the crease of the Top Note. Adhere the other end to the bag and your are ready to pass them out!
Subscribe to:
Comments (Atom)


